Featured Post

Humana Medicaid Benefits: Navigating Healthcare with Confidence

  Introduction In the complex landscape of healthcare, understanding and accessing the right benefits can be a daunting task. Humana Medicai...

Subscribe Us

Monday, 14 December 2020

Trueceller application

 Truecaller is a widely used mobile app across the world that finds the details of a given phone number globally from its database of user profiles and their synced phonebook contacts, integrated together as virtual phonebook. One can also find the contact details of a person by his name and other details, if he is a Truecaller user provided that he keeps his profile and contact details public.

Other than finding phone number details and profiles, Truecaller has many other functionalities. Truecaller can also be used to block spam calls and SMS. It also launched UPI payments and recharges where one can send and receive money on the Truecaller mobile app itself.

For all these functionalities and features, people are using Truecaller globally and it has more than 250 million users worldwide and more than 100 million users in India. With these things, one can see that Truecaller is a great channel for businesses and brands to reach their target audience on mobile and promote their marketing messages.

That’s the idea behind Truecaller, a smartphone caller ID app. With Truecaller, when a telemarketer calls you, you’ll be warned before you pick up the phone that it’s a spam call so long as one of the app’s 40 million users have already reported it as such. It’ll also give you info on legit callers, too. And, of course, there is a block feature. 

Share:

HOW TO GET CALL DETAILS OF ANY NUMBER

 Take one year call details in one click. How to get call history in one click: Friends in this article we will tell you that you can save your mobile phone contacts, call log, history in PDF in 1 minute on your mobile.    Can create a backup file of that.

 1- Install E2PDF - Backup Restore SMS, Call, Contact, TrueCaller app from Google playstore.

 2-see above, a page like this will open in front of you.  PDF Backup is showing you.  Click on Click to continue below that.

 3- In the above photo you see many options like sms, general call log, contacts.  Click on the thing you want to backup.  If you click on sms then all 1 sms of your 1 year will be backed up.  Similarly, you can easily make 1 year backup of your call log and contacts.  Now I will show you how to backup.  I click on sms.

 4-In the photo above, you can see the sms that have come on my phone during the last one year.  Now scroll down and go down.

 5- In the photo above, you can see that the option to Export to PDF is visible.  Write sms on it.  Now click on Export to PDF.  Sometime your back up will be complete.

 6-Now open My Files.  Then click on Internal Storage.

 7- Friends, I installed E2PDF - Backup Restore SMS, Call, Contact, TrueCaller app.  So our backup file will also be named as E2PDF.  In the photo above, you can see the file named E2PDF - Backup Restore inside Internal Storage.  Click on it

 8- In the above photo you can see that the backup of sms of last 1 year has been made as PDF file, click on it

 9- In the above photo you can see that the backup of all sms of last 1 year has been saved in my phone in PDF file.  In this way, friends, you can also save your phone contact / call people / SMS.

 DOWNLOAD

Share:

Sunday, 13 December 2020

WhatsApp tips and tricks: How to disable blue ticks and hide last seen on WhatsApp

 We might love the popular instant messaging platform, WhatsApp for all the features it has to offer, but the blue tick marks and last seen notification is not preferred by everyone.

To the dismay of its users, WhatsApp introduced the 'read receipts' (Blue ticks) option in its app to display checkmarks next to each message you send. The feature lets people see precisely when the message is read. It works in a simple way. When the grey checkmarks turn blue that means the receiver has read your message but when the tickmarks remain grey - it just means that the message has only been delivered. 

Earlier, WhatsApp users could only see when the message was delivered but since the inception of the read receipts option, they get to know when you are ignoring them by not replying to their messages (you have already read). And that's when the problem arises.

Although it helps you in comprehending when a person -- you are sending texts to -- even after reading your messages is not replying, it brings you in trouble when you are the one not replying to someone else's messages. 

Apart from the 'read receipts' option, the 'last seen' notification on WhatsApp, similarly, is one of the features that give you no privacy. It let all your contacts know when you were last online and when their message reached you. With this feature, your contacts get permission to see and check when you were active on the app. 

We might love the popular instant messaging platform owned by Facebook for all the features it has to offer, but the blue tick marks and last seen notification is not preferred by everyone. 

Luckily, WhatsApp has an option to disable both these features and there are simple ways to avoid letting others know when you are reading their messages or when you were last online on the app. Here's a quick guide to help you keep your privacy on WhatsApp intact. 

How to disable blue ticks and hide last seen on WhatsApp

Before getting relieved of the annoying Blue ticks aka read receipts option, you must know that after disabling the read receipts you will no longer be able to see when the receiver read your message, in the same way, they will not be able to see when you read their message.


Likewise, once you disable the last seen option on WhatsApp, you too will not be able to check when your contacts were last online. So, if you have made up your mind then follow these five simple steps to disable blue ticks and hide last seen on WhatsApp.


STEP 1 : Open WhatsApp

Open the app on your smartphone to disable the option

STEP 2 : Tap on three dots

On the top right corner of the app, you will find three vertical dots. 

STEP 3 : Head to Settings

Now go to the 'Settings option and tap on the 'Account' then click on 'Privacy' 

STEP 4 : Disable Read receipts

A list of options will be displayed on the screen (like in the picture given below). Now uncheck the 'read receipts' option which will turn its button from green to grey. 

STEP 5 : Disable Last seen

Now tap on the last seen option and according to your preference click on any of three options - Everyone, My Contacts or Nobody

Share:

All about the Aadhaar card update process

 Aadhaar is the largest biometric identification system in the world, where individuals are provided with a unique 12-digit number which is linked to their biometrics. It would not be an exaggeration to say that in future Aadhaar would become mandatory for availing the benefits of government schemes. 

Aadhar card serves as proof of address and identity as well. It is therefore essential that all your details and information in the Aadhaar card are accurate. Otherwise, you might not be able to receive the benefits of government schemes. If there have been any changes in your information or biometrics, you must go for an Aadhar Card Update immediately.

1. When do you need to go for an UIDAI Aadhaar Update?

There can be some situations that can require you to apply for Aadhaar card correction. Some of the most common scenarios being: –

  • Change in your contact details (mobile number or address)
  • Change in your name (after marriage or willingly)
  • Clerical errors by the operator during the enrolment process
  • Change in Biometrics due to an accident (Fingerprint, Iris)
  • Change in the local language
  • Quality of biometrics captured during enrolment not being up to the mark.
  • Updating Aadhaar card with the age of a child (at the age of 5 years and 15 years)
  • The demand for additional documents by UIDAI
  • In case of multiple authentication failures

2. Documents required for an Aadhaar Card Update

The documents required for updating your Aadhar data vary according to the nature of the change required. The detailed list of documents could be checked at the official portal of UIDAI or by clicking on the following link: –

https://resident.uidai.gov.in/Resident-theme/pdf/valid_documents_list.pdf

3. Aadhaar Card Update Process

The Aadhaar card update process can be completed via two modes, i.e. through an online portal or enrolment centre.

While the demographic information can be updated through any of the above two modes, updating biometric data is possible only through the enrolment centre.

Here is the detailed stepwise guide to help you with the UIDAI Aadhar update.

1. Aadhaar Card Correction through the online portal

If you want to change or update the demographic data in your Aadhar such as Aadhaar card mobile number update or address update online, you can log-on to the self-service portal of the UIDAI and follow the steps mentioned below for any Aadhaar card correction online.

a. Log-on to the official UIDAI website at https://ssup.uidai.gov.in/aadhaar-home/.
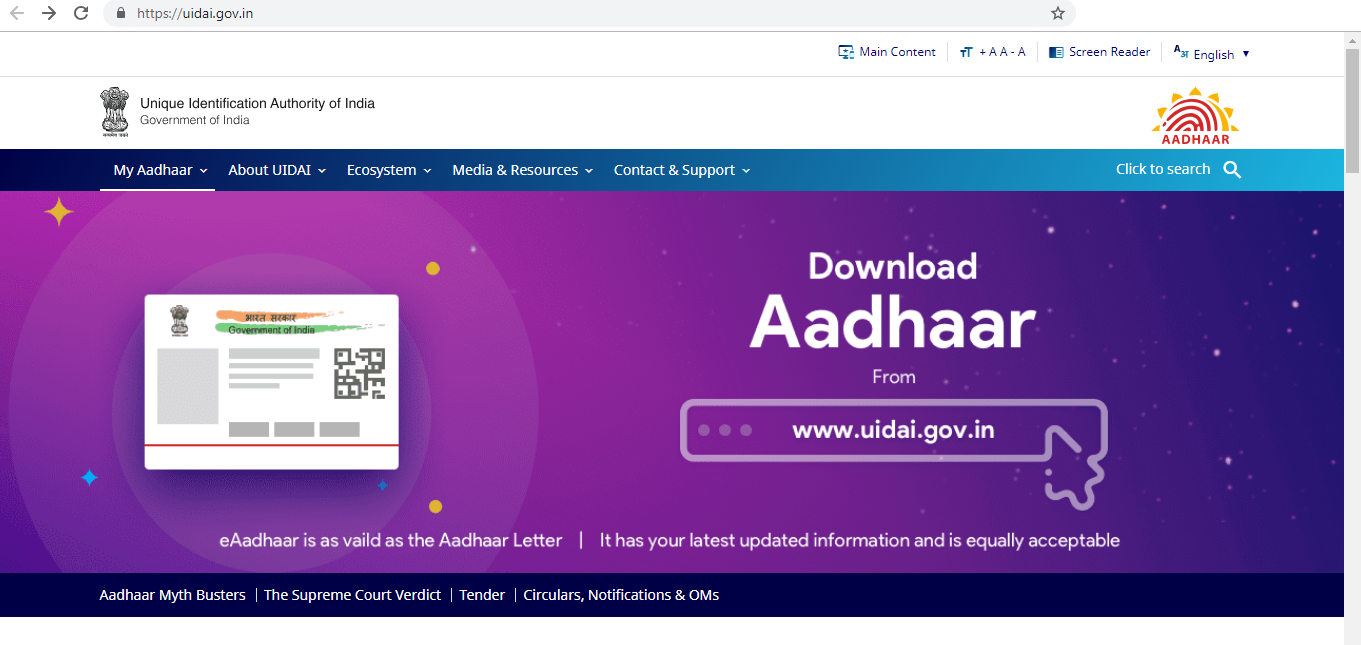
Aadhaar Home Page

b. Locate the section titled “Update Your Aadhaar ” and then click on the link “Update your address Online.”

Update aadhaar online

c. On the next page, enter your Aadhaar number and type in the captcha code and click on the button “send OTP”.

You will receive an OTP on your registered mobile number. Type in the OTP when prompted. This will take you to your Aadhaar update portal.
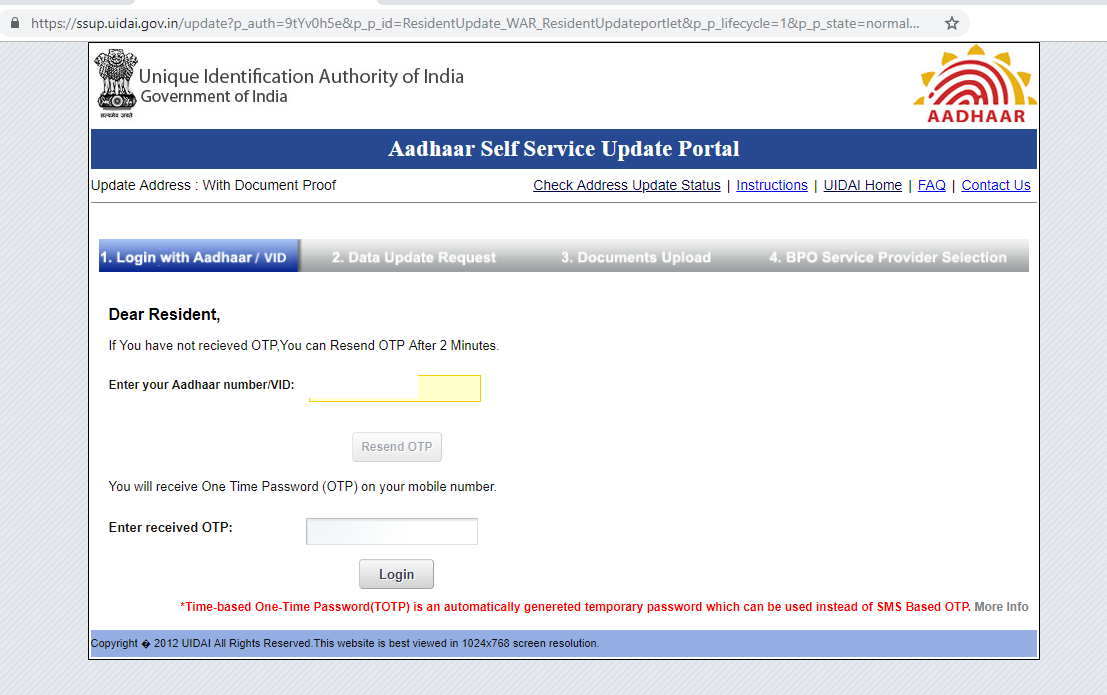
Update aadhaar online

d. Here, you can select the demographic information that you want to update such as name, address, mobile number etc.

e. Now, enter the updated information as updated on the screen. Make sure that you enter the correct and up to date information. Also, check if every other information in your Aadhar data is accurate. If you need to change any information regarding the pin code, district, post office, state etc. you must contact the UIDAI help desk at help@uidai.gov.in.

f. After you are satisfied with the details, click on the “Submit” button. This will generate a URN. Note down the URN at a safe place as it will be required to check the Aadhar card update status later on.

g. You will now be given the option to select a BPO for your request. Select any of the given BPO and click submit.

Now on the next page, you will be asked to upload scanned and self-attested copies of the approved documents as mentioned at  https://resident.uidai.gov.in/Resident-theme/pdf/valid_documents_list.pdf

  1. You can now download the copy of the acknowledgement.
  2. It usually takes a few working days for the information to be updated. You can check the status of your update request using the URN on the portal.
  3. If your request is approved, you will receive your updated Aadhar card through mail at your address. If the request is rejected for any reason, you will need to re-apply for the same.

2. Aadhaar Card Correction through Enrolment Centre

If you do not have access to internet and computer, or need to update your biometric details, you can visit your nearest Aadhar enrolment centre. Steps involved in changing the Aadhaar details through an enrolment centre are:-

Find out the nearest Aadhaar enrolment centre through the UIDAI portal.

Locate aadhaar enrolment center

  1. You are not required to make any prior appointment and can visit the permanent enrolment centre as per your convenience.
  2. Make sure you take the original copies of all your documents that have been mentioned against the respective change of information option. You can access the list of documents at  – https://resident.uidai.gov.in/Resident-theme/pdf/valid_documents_list.pdf
  3. The operator would verify your details and if your documents are in order, and then the operator will proceed with the Aadhaar card correction online.
  4. The operator would enter all the details in the software, take your biometrics (if required) and scan the copies of your documents.
  5. Once the process is completed, you will get an acknowledgement receipt which will have the URN.
  6. You can track the status of the update request against your Aadhaar through the UIDAI portal.
  7. If your documents are in order, you will receive the updated copy of Aadhar at your address in a few working days.

Getting the information in your Aadhaar Card is extremely important otherwise you might lose out on several benefits that you are entitled to. With the help of the online portal as well as a permanent enrolment centre, the process of the Aadhar card update has become conveniently easy. If you also need to get your Aadhaar data updated, you must act soon and complete the process through the appropriate online channels.

Share:

Saturday, 12 December 2020

If your phone’s battery does not run much, then do this setting, it will work

 Everybody now uses smartphones instead of mobile phones. Although smartphones have more features than normal phones, but no solution has yet been found regarding their battery life. Due to multifunction, their battery runs out quickly, which keeps users worried. But there is no need to worry because we are telling you about such settings by which you can save your smartphone battery from running out quickly.

Screen timeout
Setting the screen timeout in the smartphone means that you are not using your handset. Upon making this setting, the handset’s screen automatically locks. If you do this setting in the phone, then your phone battery will not drain quickly. You can select in it yourself that the vocabulary should be turned off after seconds / minutes.

Keep GPS Off
Nowadays GPS is being used more. The location can be detected from this. If you do not use GPS, then you offer it. Due to its continuous on, it costs more than the battery of the phone.

Power saving modes
Now in most of the smartphones, the power saving mode option has started defaulting if your phone does not have the option. However, if your phone does not have this feature, download it from the Google Play Store and keep it on forever.

Original charger

When we go out somewhere, we forget to take our Charger with us, in such a situation, we charge our phone with another Charger, which ends the battery life of our phone very soon. Keep in mind that you should never charge your Smartphone with Duplicate Charger or any other Mobile Charger. Charging Point of the Mobile gets deteriorated when Charging with Duplicate Charger, and the battery soon deteriorates.

Do not use Fast Charger

In today’s time, you will find many such Fast Chargers that will make your Smartphone Full Charge in some time, but users forget that this can ruin the battery of your Smartphone, so as much as possible with such Charger Try to save your Smartphone.

Do not leave Charge at night

Being a person has made it a habit that when he sleeps at night, he leaves the phone on Charging, which keeps the phone charging all night, whereas it is better to charge the Smartphone continuously for at least 2 or 3 hours. It is, if you also leave your phone on the Charge overnight, then change this habit now so that the battery life of your Smartphone can last longer.

Avoid Full Charging

Your Smartphone should not charge 100%, this reduces your battery life, the phone should be charged up to 80% only after which the phone starts heating up and its effect on the battery’s capacity.

Share:

How to enter your home or shop name address on Google map?

 Do you also want to learn how to enter your home, shop or any famous place on Google Maps. So believe me, this post today is only for you. It is very easy to put your address location on Google Map. Which you will know after reading this post.

Let me tell you that along with putting your name and address on Google Map, you can also add a photo, website and business card of that place. However google verifies the information you entered. Only then the details you enter are added to google map. It takes 24 to 48 hours.

Especially those who do business. They want to reach the name and address of their shop to as many people as possible. In this case, if they add their name and address on google map. So the customer can easily reach their address.

To add your location on Google Map, you just need three things. First Smartphone, second Internet and third gmail id, if you have these three things. So you can enter the name and address of your house or shop in Google Maps.

So, without delay, let us now know that how to put your name and location in Google Map? To put your address location on Google Map, you just have to follow some simple steps mentioned below.

First of all, let us know that wherever you want to add the address on google map. If possible, you should sit in the same place and follow this procedure as mentioned below. Because by doing this, your location on Google map will be a perfect ad. So let’s know how to put location on Google map?

Step 1: First of all you open Google map app in your smartphone and login by entering gmail id, password.

Step 2: Now tap on the menu button in the top left side of the app.

Step 3: Here below you will see the option of Add a missing place, tap on it.

Step 4: In this page you have to fill up and submit the complete details of your address location.

  1. Name: Here you enter the name of your shop or place. Which you want to appear on google map.
  2. Category: Here you select your address category. For example, if you want to add your shop, then you select the shop. The same if you are adding the address of a temple. So select Temple in category. It means to say that you are adding the address of any place. Select the category according to that thing.
  3. Location: Here you select your place. The place you want to appear on Google map. To do this, you turn on your phone’s gps and then click on the button of update location on map. After doing this, your address will come automatically.
  4. Add others details: Now you can click on this button to add your phone number, hours, website, opening date and photos. As soon as you click, options will come in front of you to interconnect them.

Add hours: enter hours here. That is, your shop remains open for how many days a week, from how many hours to how many hours.
Add phone number: Here you enter your phone number so that the customers direct can talk to you.
Add website: If you have a website. So you enter the URL of your website here.
Add opening date: Leave this option as is.
Add photo: Here you can add a photo of your shop or place.

Step 5: When you fill up all the details well. Then you tap on the arrow mark given in the top right side. So that all your details are submitted to Google.

After the details are submitted, Google will verify the information you entered. If you have filled up the correct information. So your address will start showing on google map within 24 to 48 hours.

Note: If you think you have entered the wrong name, place or address. So you can correct it by editing it. To do this, you have to go to the three line menu option again and tap on Your Contribution and go to Edit.

How to know if the location added on Google Map is approved or dis-approved?

The detail you have added on Google Map. To check its status, you can find out by following some of the steps mentioned below.

Step 1: Google has approved or dis-approved your details. To know its status, first of all you open Google Map and go to Menu option.

Step 2: Here you will see the option of your contribution, you select it.

Here you will know that your details (name, address, location) have been added on Google map. It has been approved or dis-approved.

Share:

Is egg veg or non-veg? Scientists have found the answer

 Method

Often, the question arises in the minds of people whether the egg is a wedge or a non-veg? At the same time, some people believe that it comes in non-veg category because it gives it to chicken. Scientists have found the answer to your question, while there are some people who are not accepting this theory as correct.

So milk would also be vegetarian

Vegetarian people believe that the egg has come from the chicken, so if the chicken is non-veg, then the egg is also non-veg, but let us tell you that science says that milk also comes from the animal, so how did it become vegetarian?

Eggs found in the market are unfertilized

People think that the egg comes out of chick, so it is non-vegetarian whereas all the eggs found in the market are unfertilized. That is, chickens never come out of these eggs. Scientists have also tried to answer this question through science to clear the misconception of this. According to him, the egg is vegetarian.

It turns out that the egg is vegetarian

Eggs have three layers. The first is the yolk on the skin, the second the white and the third egg yolk. Yoke means yellow part. According to a research done on eggs, only egg whites contain protein. No part of the animal is present in it. Therefore technically egg white is a white wedge.

Non-vegetarian happens

Like egg white, egg yolk i.e., yolk also contains a good amount of cholesterol and fat along with protein. The egg comes only after coming into contact with the chicken and the chicken. They contain gamet cells which make it non-vegetarian. Whereas nothing like this happens in marketed eggs.

Then how does a chicken hatch an egg?

The hen starts laying eggs after 6 months. She lays eggs every 1 or one and a half days, but please tell that it is not at all the case that the hen must come in contact with any hen. These eggs are called unfertilized egg. Scientists claim that chickens can never come out of them.

Share:

Ads